Chat
Getting Started
Welcome to LLMSymphony. This guide will help you understand and utilize all features of our application.
Main Window

Using Chat Functions
Prerequisites
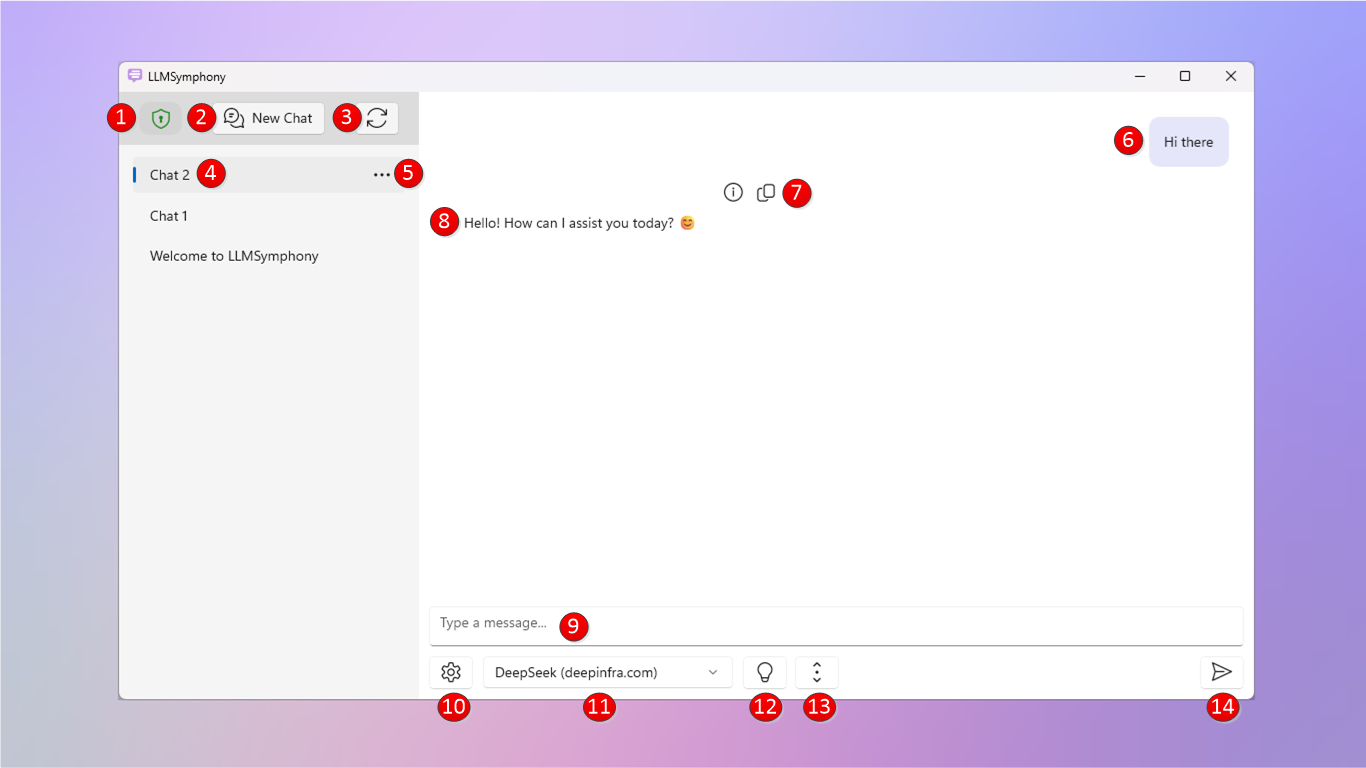
If you have not created a Profile (11), please proceed to adding a Profile first under Settings (10).
| Function | Description |
|---|---|
| Sending a Message | Chat with the AI model as defined in the Profile (11) by typing in the message box (9) and pressing Enter or clicking on Send (14) |
| Changing Model | If your Profile has a Secondary Model configured, press Think (12) button to switch to the Secondary Model. |
| Changing Profile | Change the Profile by clicking on the Profile dropdown (11) and selecting a different Profile from the list |
| Auto Scroll | Enable or disable auto-scrolling by toggling the Auto Scroll switch (13) |
| Stop Streaming | Stop the AI model from generating responses by hitting the Stop Button (14). The Send button turns into a Stop button during AI bot streaming |
| New Chat | Start a new chat session by clicking on the New Chat button (2). Your old chat will appear in Chat history (4) |
| Chat History | View your chat history in the Chat History section (4). Click on a chat to load it into the active chat window |
| Delete Chat | Delete the Chat by clicking on "..." (5) and Delete. Note if the Chat is saved to Disk (3), the saved version will not be deleted unless Synced (3) is pressed |
| Rename Chat | Rename the Chat by clicking on "..." (5) and Rename. Note if the Chat is saved to Disk (3), the saved version will not be renamed unless Synced (3) is pressed |
| Save Chat | Save all Chats to local disk by clicking on Sync button (3). The Chat will be saved to disk and will persist after App closes |
| Protection Status | Hover over the Padlock icon (1) to see how many Chats are encrypted on disk, the number of API keys encrypted in Settings, and the App version number |
| Copy | To copy a specific AI bot response, click on the Copy button (7) next to the response. The response will be copied to your clipboard in Markdown format. To copy an entire Chat, press "..." (5) and Copy (Text). To screenshot an entire Chat, press "..." (5) and Copy (Screenshoot) |
| AI Model Info | Click on the Info button (7) to view information about the AI model and AI Hosting Provider which generated the response |
Settings
Settings Window

| Function | Description |
|---|---|
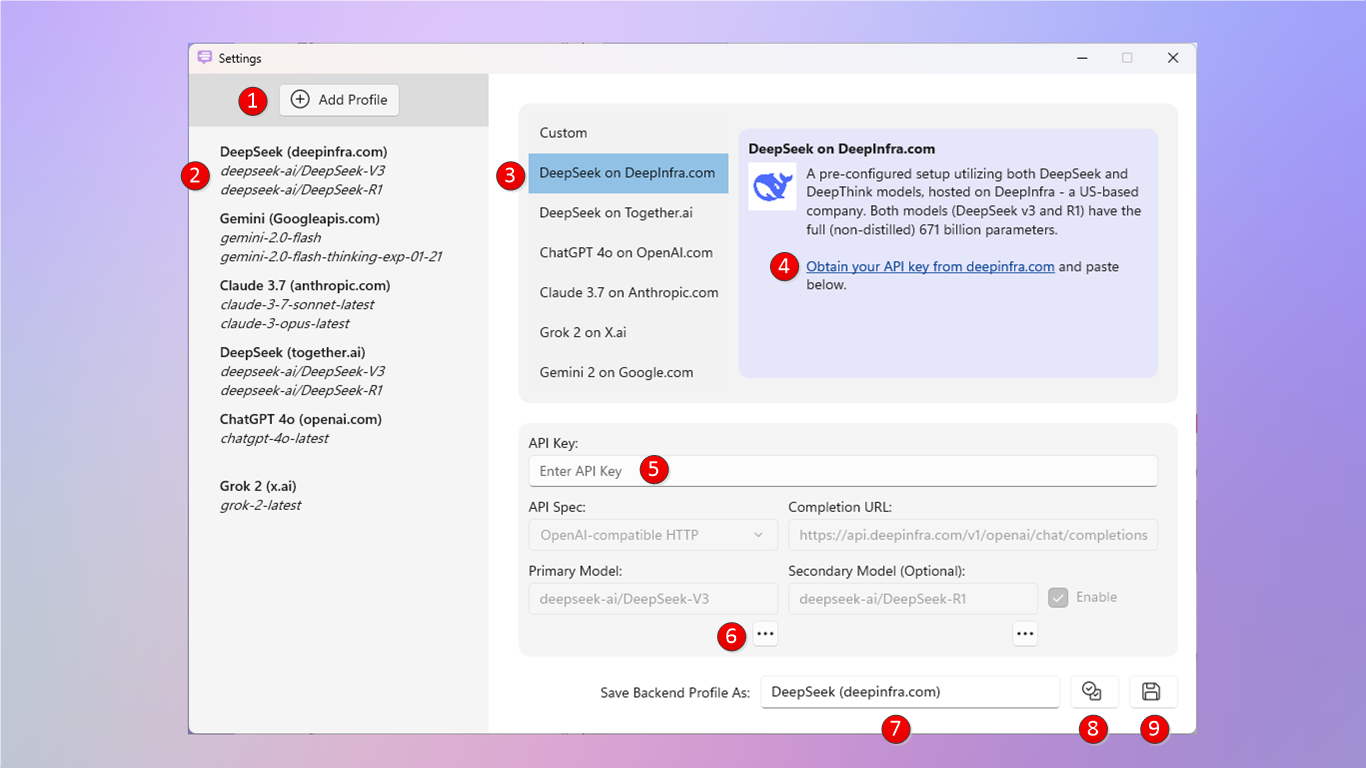
| Add Profile | Creates a new Profile (1), a Profile is an instance of a AI Hosting Provider, which can be configured with up to 2 AI Models (Primary and Secondary). You can create as many Profiles as you want (of the same Provider or different Provider), and use the Profile Dropdown Box in the Main Chat Window to select it |
| Profile List | Saved Profiles (2) appear here. Bold is the Profile name, and in italic are the AI model names configured inside the Profile |
| Delete Profile | Click on a Saved Profile (2) then "..." and click on Delete. The Profile will then be deleted. |
| Pre-Configured or Custom |
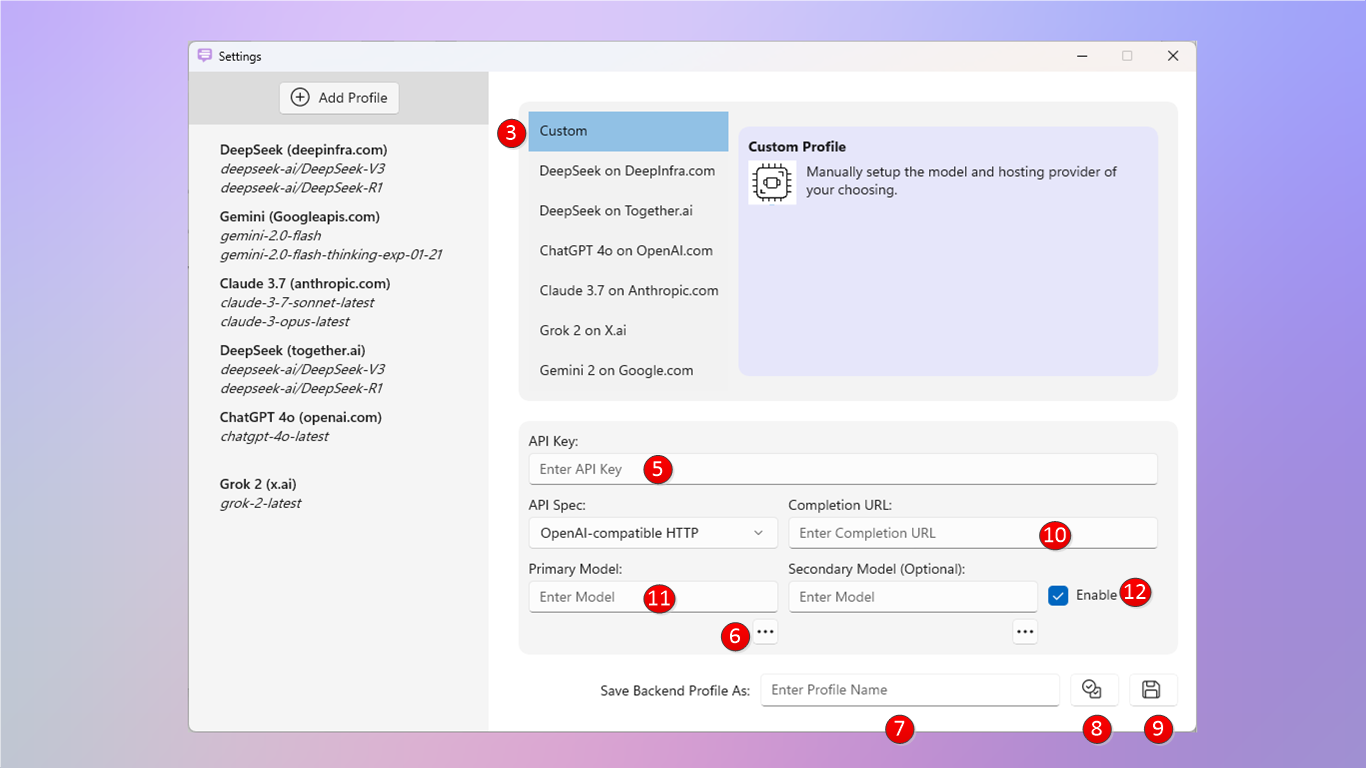
You can chose a Pre-Configuerd Profile (3) of the AI Provider (and pre-chosen AI models) and just supply your own API Key from the AI Provider. Or Chose "Custom" (3) and configure your own settings (See Adding a Custom Profile) |
Adding a Pre-Configured Profile - Just need your API Key
| Step | Instructions |
|---|---|
| 1 | Click the Add Profile (1) button |
| 2 | Select one of our Pre-Configured Profiles (3) for quick setup |
| 3 | Follow the AI Provider instructions via the direct web link (4) to get your API Key |
| 4 | Enter your API Key in the API Key textbox (5) |
| 5 | Keep the default Profile Name (7) or customize it |
| 6 | Click Test (8) to verify connectivity with your API Key |
| 7 | Click Save (9) to store your profile |
You can now start chatting with your pre-configured profile with just a single copy/paste of your API Key!
Adding a Custom Profile

| Step | Instructions |
|---|---|
| 1 | Click the Add Profile (1) button |
| 2 | Enter your API Key in the API Key textbox (5) |
| 3 | Enter the Completion URL (10) e.g. https://api.openai.com/v1/chat/completions (Note: add /chat/completions after the base URL if the provider only provides you with a base URL), check with your API provider's documentation. The API Provider must be using the OpenAI API Spec |
| 4 | Enter the AI model (11) you want to chat with (e.g. chatgpt-4o-latest), check the documentation of your API provider |
| 5 | Click "..." (6) You can adjust the Max Tokens, Temperature and Top P values of the model or leave at the default values. |
| 6 | If you want to fast switch to a Secondary Model on the same AI Provider, enter in the AI model in the Secondary Model text box. Or else Uncheck Enable (12) checkbox |
| 7 | Create your own Profile name (7) |
| 8 | Click Test (8) to verify connectivity with your API Keys and that it has access to the AI Models configured |
| 9 | Click Save (9) to store your profile |
You can now start chatting with your custom configured profile!